
Let’s build a Raspberry Pi Cluster running Docker and Kubernetes. There has been already a handful of good recipes, however this howto is a bit different and provides some unique features.
My main motivation for going the Raspberry Pi road for a Kubernetes cluster was that I wanted something fancy for my Kubernetes talk to show, shamelessly stealing the idea from others (kudos to @KurtStam, @saturnism, @ArjenWassink and @kubernetesonarm for the inspiration ;-)
I.e. the following Pi-K8s projects already existed:
- kubernetes-installer-rpi : A set up shell scripts and precompiled ARM binaries for running Kubernetes by @KurtStam on top of the Hypriot Docker Image for Raspberry Pi.
- Kubernetes on ARM : An opinionated approach by @kubernetesonarm with an own installer for setting up Kubernetes no only for the Pi but also for other ARM based platforms.
- K8s on Rpi : Another shell based installer for installing a Kubernetes cluster by @ArjenWassink and @saturnism
When there are already multiple recipes out there, why then trying yet another approach ?
My somewhat selfish goals were:
- Using (and learning on the way) Ansible for not only a one-shot installation but also maintainance and upgrades.
- Learning myself how to setup a Kubernetes cluster. This setup includes flannel as an overlay network, the SkyDNS extension and soon also a registry. Using Ansible helps me to incrementally add on top of things already installed.
- Want to use WiFi for connecting the cluster. See below for the reason.
- Get OpenShift Origin running and be able to switch between Ansible and OpenShift via Ansible.
- Create a demonstration platform for my favourite development and integration platform fabric8.
As it turns out the whole experience was very enlightening to me. Its one thing to start Kubernetes on a single node within a VM (because multiple VM-based nodes kill soon your machine resourcewise) or having a small bare metal cluster, which blinks red and green and where you can plug wires at will. Not to mention the the geek factor :)
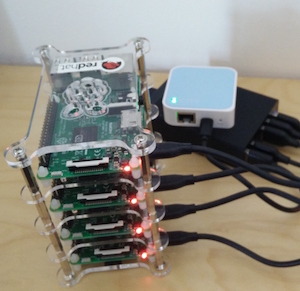
Shopping List#
Here’s my shopping list for a Raspberry Pi 3 cluster, along with (non-affiliate) links to (German) shops, but I’m sure you can find them elswhere, too.
| Amount | Part | Price |
|---|---|---|
| 4 | Raspberry Pi 3 | 4 * 38 EUR |
| 4 | Micro SD Card 32 GB | 4 * 11 EUR |
| 1 | WLAN Router | 22 EUR |
| 4 | USB wires | 9 EUR |
| 1 | Power Supply | 30 EUR |
| 1 | Case | 10 EUR |
| 3 | Intermediate Case Plate | 3 * 7 EUR |
All in all, a 4 node Pi cluster for 288 EUR (as of April 2016). Not so bad.
Some remarks:
- Using WiFi for the connection has the big advantage that the Raspberry Pi 3 integrated BCM43438 WiFi chip doesn’t go over USB and saves valuable bandwidth used for IO in general. That way you are able to to get ~ 25 MB/s for disk IO and network traffic, respectively. And also less cables, of course. You can alway plug the power wire for demos, too ;-)
- A class 10 Mirco SD is recommended but it doesn’t have to be the fastest on the world as the USB bus only allows around 35 MB/s anyway.
Initial Pi Setup#
Most of the installation is automated by using Ansible. However the initial setup is a bit more involved. It certainly can be improved (e.g. automatic filesystem expanding of the initial Raspian setup). If you have ideas how to improve this, please open issues and PRs on Project31/ansible-kubernetes-openshift-pi3. Several base distributions has been tried out. It turned out that the most stable setup is based on a stock Raspian. Unfortunately it doesn’t provide a headless WLAN setup as it is possible with the latest Hypriot images, but for the moment it much more stable (I had strange kernel panics and 200% CPU load issues with the Hypriot image for no obvious reasons). Since this is a one time effort, let’s use Raspbian. If you want to try out the Hypriot image, there’s an experimental branch for the Ansible playbooks which can be used with Hypriot. I will retry Hypriot OS for sure some times later.
Download the latest Raspian image and store it as
raspbian.zip:curl -L https://downloads.raspberrypi.org/raspbian_lite_latest \ -o raspbian.zipInstall Hypriots’ flash installer script. Follow the directions on the installation page.
Insert you Micro-SD card in your Desktop computer (via an adapter possibly) and run
flash raspbian.zipYou will be asked to which device to write. Check this carefully, otherwise you could destroy your Desktop OS if selecting the the wrong device. Typically its something like
/dev/disk2on OS X, but depends on the number of hard drives you have.Insert the Micro SSD card into your Raspberry Pi and connect it to a monitor and keyboard. Boot up. Login in with pi / raspberry. Then:
 raspi-config --expand-rootfs
 vi /etc/wpa_supplicant/wpa_supplicant.conf
and then add your WLAN credentials
 network={
    ssid="MySSID"
    psk="s3cr3t"
 }
Reboot
Repeat step 2. to 5. for each Micro SD card.
Network Setup#
It is now time to configure your WLAN router. This of course depends on which router you use. The following instructions are based on a TP-Link TL-WR802N which is quite inexepensive but still absolutely ok for our purposes since it sits very close to the cluster and my notebook anyway.
First of all you need to setup the SSID and password. Use the same credentials with which you have configured your images.
My setup is, that I span a private network 192.168.23.0/24 for the Pi cluster which my MacBook also joins via its integrated WiFi.
The addresses I have chosen are :
| 192.168.23.1 | WLAN Router |
| 192.168.23.100 | MacBook’s WLAN |
| 192.168.23.200 … 192.168.23.203 | Raspberry Pis |
The MacBook is setup for NAT and forwarding from this private network to the internet. This script helps in setting up the forwarding and NAT rules on OS X.
In order to configure your WLAN router you need to connect to it according to its setup instructions. The router is setup in Access Point mode with DHCP enabled. As soon as the MAC of the Pis are known (which you can see as soon as they connect for the first time via WiFi), I configured them to always use the same DHCP lease. For the TL-WR802N this can be done in the configuration section DHCP -> Address Reservation. In the DHCP -> DHCP-Settings the default gateway is set to 192.168.23.100, which my notebook’s WLAN IP.
Startup all nodes, you should be able to ping every node in your cluster. I added n0 … n3 to my notebook’s /etc/hosts pointing to 192.168.23.200 … 192.168.23.203 for convenience.
You should be able to ssh into every Pi with user pi and password raspberry. Also, if you set up the forwarding on your desktop properly you should be able to ping from within the pi to the outside world.
Ansible Playbooks#
After this initial setup is done, the next step is to initialize the base system with Ansible. You will need Ansible 2 installed on your desktop (e.g. brew install ansible when running on OS X)
Ansible Configuration#
Checkout the Ansible playbooks:
 git clone https://github.com/Project31/ansible-kubernetes-openshift-pi3.git k8s-pi
 cd k8s-pi
Copy over
hosts.exampleand adapt it to your needscp hosts.example hosts vi hostsThere are three Ansible groups which are refered to in the playbooks:
| pis | All cluster node |
n0,n1,n2,n3| | master | Master node |n0| | nodes | All nodes which are not master |n1,n2,n3|Copy over the configuration and adapt it.
 cp config.yml.example config.yml
 vi config.yml
You should at least put in your WLAN credentials, but you are also free to adapt the other values.
Basic Node Setup#
If you have already created a cluster with these playbooks and want to start a fresh, please be sure that you cleanup your ~/.ssh/known_hosts from the old host keys. You should be able to ssh into each of the nodes without warnings. Also you must be able to reach the internet from the nodes.
In the next step the basic setup (without Kubernetes) is performed. This is done by
ansible-playbook -k -i hosts setup.yml
When you are prompted for the password, use raspberry. You will probably also need to confirm the SSH authentity for each host with yes.
The following steps will be applied by this command (which may take a bit):
- Docker will be installed from the Hypriot repositories
- Your public SSH key is copied over to pi’s authenticated_keys and the users password will be taken from
config.yml - Some extra tools are installed for your convenience and some benchmarking:
- hdparm
- iperf
- mtr
- Hostname is set to the name of the node configured. Also
/etc/hostsis setup to contain all nodes with their short names. - A swapfile is enabled (just in case)
With this basic setup you have already a working Docker environment.
Now its time to reboot the whole cluster since some required boot params has been added. Plug the wire.
Kubernetes Setup#
The final step for a working Kubernetes cluster is to run
ansible-playbook -i hosts kubernetes.yml
This will install one master at n0 and threed additional nodes n1, n2, n3.
The following features are enabled:
etcd,flanneldandkubeletare installed as systemd services on the masterkubeletandflanneldare installed as systemd services on the nodes- Docker is configured to use the Flannel overlay network
kubectlis installed (and an aliask)
If there are some issues when restarting services in the master, don’t worry. However you should best restart the master node n0 when this happens, because when setting up the other nodes the would fail if not all services are running on the master.
After an initial installation it may take a bit until all infrastructure docker images has been loaded. Eventually should be able to use kubectl get nodes from e.g. n0. When this wotks but you see only one node, please reboot the cluster since some services may have not been started on the nodes (plug the cables when n0 is ready).
Install SkyDNS#
For service discovery via DNS you should finally install the SkyDNS addon, but only when the cluster is running, i.e. the master must be up and listening. For this final step call:
ansible-playbook -i hosts skydns.yml
Wrap Up#
This has become a rather long recipe. I re-did everything from scratch within 60 minutes, so this could be considered as a lower boundary (because I already did it several times :). The initial setup might be a bit flaky, but should be easy to fix. I’d love to hear your feedback on this, and maybe we get it more stable afterwards. Remember, that’s my first Ansible playbook :)
Now go out, buy and setup your Kubernetes cluster and have fun :-)